Vuex学习
Vuex学习
📚 Vue 学习目录
🚀 Vue.js基础学习 - 📝 Vue.js进阶 - 🎞️ Vue3学习 - 🔦 webpack学习 - 📦 Vue-CLI学习 - 📌 Vue-router学习 - 🔮 Vuex学习 - 🕶️ ElementUi学习(上) - 🚡 ElementUi学习(下) - 🚁 Vue仿蘑菇街项目 - 🌍 Vue响应式原理解读 - 🎀 Nuxt.js 学习
文章中的资料来自: https://github.com/zhangtianyi0110/VueLearnNotes/blob/master/19-vuex/19-vuex.md 、自己优化
视频: https://www.bilibili.com/video/BV15741177Eh/?p=129
什么是Vuex
Vuex就是一个状态管理模式,为什么叫模式?
因为Vuex包含了一套对state(状态)的操作规范,集中存储管理应用的所有组件的状态。
状态管理
简单来说就是管理各个组件共享的数据,类似session
session可以存数据,存的过程就是管理,数据的每一次赋值就是当次状态。
Vuex在Vue实例顶层中。
Vuex也可以理解为java中的一个map,这个map是static(静态资源)的,每次获取map的值,都需要调用java的api,比如
map.get(key)获取对应的值,也可以放入数据map.put(data),而且这个数据是所有类都可以调用的,只需要导入这个map就能使用里面的共享数据。不了解java也没关系,你也可以理解成为百度百科就是一个容纳百科知识的容器,你要搜vuex,百科就会出现vuex的描述,这个搜索就是获取状态,如果你角色百科的vuex描述有误。你也可以发起修改操作,改成正确的vuex描述,这个修改操作就是修改vuex在百科里面的状态。当然你可以搜索修改vuex,别人也可以,因为这个状态是共享的。
简单来看实现这个功能好像我们自己封装一个对象就能实现,但是
Vuex有一个特性就是响应式。如果我们自己封装对象想做到完美响应式比较麻烦,所有Vuex帮我们做了这个事情。
什么状态需要Vuex去管理?
- 比如用户的登录的状态(token)、用户的信息(头像、名称、地理位置信息)等等
- 比如商品的收藏,购物车的商品等等
- 这些状态应该是响应式的,用户昵称、头像修改了需要响应
Vuex简单模型

state,驱动应用的数据源;view,以声明方式将 state 映射到视图;actions,响应在 view 上的用户输入导致的状态变化。
这是一个单页面数据流向,比如想要修改用户昵称,当前用户昵称的状态是A,通过输入框输入了新的昵称B,调用ajax请求后端修改成功后将state改成B,然后视图响应用户昵称的变化从A到B。
但是,当我们的应用遇到多个组件共享状态时,单向数据流的简洁性很容易被破坏:
- 多个视图依赖于同一状态。
- 来自不同视图的行为需要变更同一状态。
- 所以我们需要vuex的规范操作来管理状态。
Vuex基本使用
传统方法使用父子组件数据传递
使用Vue-CLI4创建项目
1 | <template> |
1 | <template> |
此时我们使用了父子组件通信来完成子组件HelloVuex获取父组件的count。
如果不是父子组件如何通信,此时就需要vuex了,还是这2个组件,现在不使用父子通信,直接使用vuex。
使用vuex管理状态
使用
npm install vuex --save安装Vuex安装插件
Vue.use(Vuex),在src下新建一个store文件夹,新建一个index.js1
2
3
4
5
6
7
8
9
10
11
12
13
14
15import Vue from 'vue'
import Vuex from 'vuex'
// 1.安装插件
Vue.use(Vuex)
// 2.创建对象
const store = new Vuex.Store({
state: { // 状态集合
count: 0 // 具体的状态数据
}
})
// 3.导出store对象
export default store修改
App.vue和HelloVuex.vue,直接使用$store.state.count获取count值App.vue1
2
3
4
5
6
7
8
9
10
11
12
13
14
15
16
17
18
19
20
21
22
23
24
25<template>
<div id="app">
<h3>{{ message }}</h3>
<h3>{{ $store.state.count }}</h3>
<button @click="$store.state.count++">+</button>
<button @click="$store.state.count--">-</button>
<hello-vuex />
</div>
</template>
<script>
import HelloVuex from './components/HelloVuex'
export default {
name: 'App',
data () {
return {
message: ''
}
},
components: {
HelloVuex
}
}
</script>HelloVuex.vue1
2
3
4
5
6
7
8
9
10
11
12
13
14
15
16
17<template>
<div class="hello">
<h2>{{ message }}</h2>
<h2>这是HelloVuex的count:{{ $store.state.count }}</h2>
</div>
</template>
<script>
export default {
name: 'HelloVuex',
data () {
return {
message: 'HelloVuex'
}
}
}
</script>一般不会直接使用
$store.state.count获取vuex中的状态,也不是直接使用$store.state.count++来操作vuex中的状态。
Vuex的流程
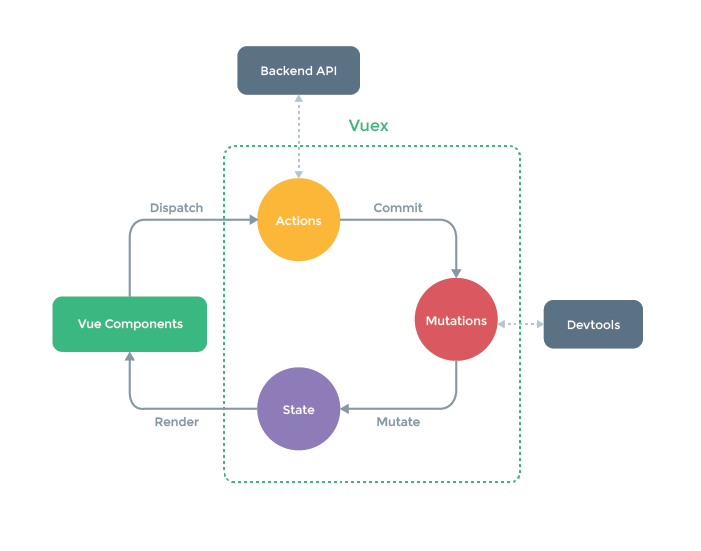
Vue Components是vue组件Mutations:更改 Vuex 的 store 中的状态的唯一方法是提交 mutationState是vuex中状态的集合- Actions与Mutations 类似,经常与后端交互,不同在于:
- Action 提交的是 mutation,而不是直接变更状态。
- Action 可以包含任意异步操作。
想要更好的调试Vue项目可以下载Chrome插件 vue-devtools
组件中修改 state,通过提交 mutation,修改完成后vuex帮我们响应到vue组件上。
案例:
修改
index.js使用mutation1
2
3
4
5
6
7
8
9
10
11
12
13
14//创建对象
const store = new Vuex.Store({
state: { // 状态集合
count: 200 // 具体的状态数据
},
mutations: { // 操作修改 state(状态) 默认有一个 state 参数
increment (state) { // 增加
state.count++
},
decrement (state) { // 减少
state.count--
}
}
})修改
App.vue提交mutation1
2
3
4
5
6
7
8
9
10
11
12
13
14
15
16
17
18
19
20
21
22
23
24
25
26
27
28
29
30
31
32
33
34<template>
<div id="app">
<h3>{{ message }}</h3>
<h3>{{ $store.state.count }}</h3>
<button @click="add">+</button>
<button @click="sub">-</button>
<hello-vuex />
</div>
</template>
<script>
import HelloVuex from './components/HelloVuex'
export default {
name: 'App',
data () {
return {
message: ''
}
},
components: {
HelloVuex
},
methods: {
add () {
// 通过commit内填入mutations里的方法
this.$store.commit('increment')
},
sub () {
this.$store.commit('decrement')
}
}
}
</script>通过
vue-devtools测试
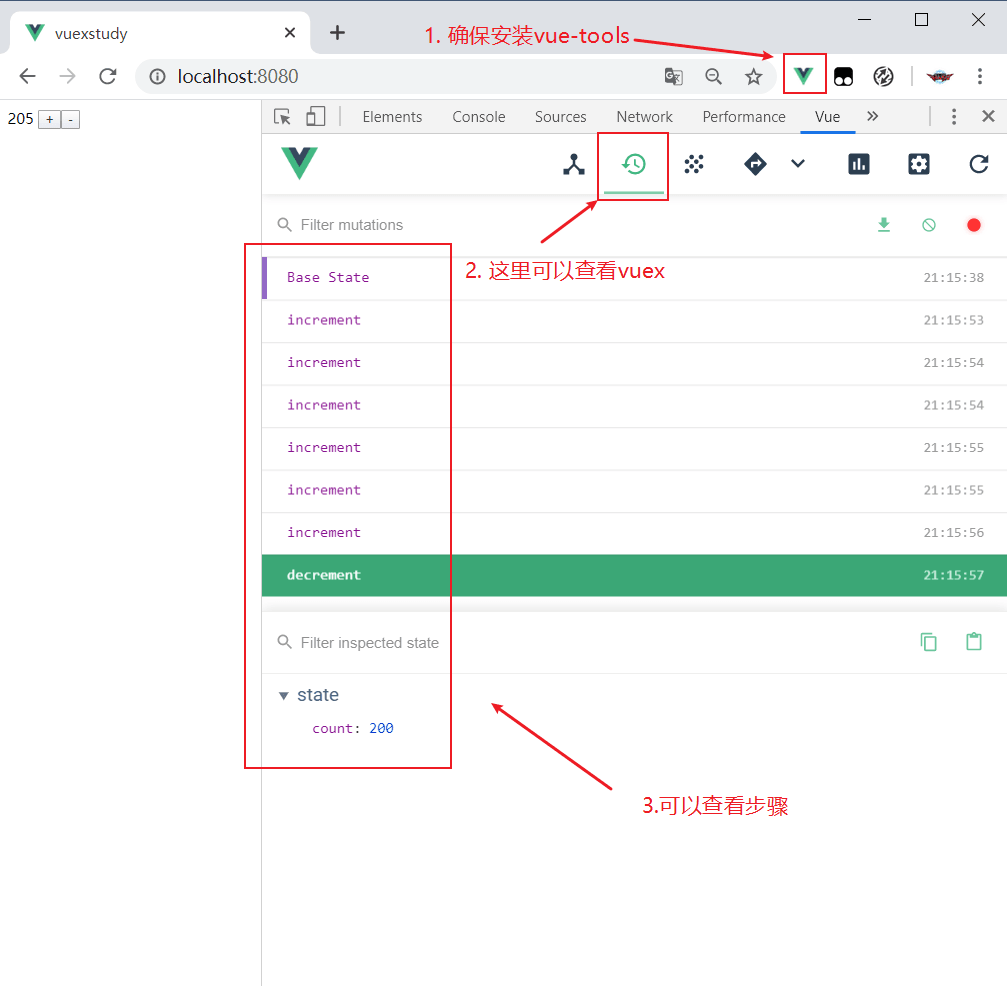
测试发现没有问题与直接使用$store.state.count++效果一致,通过提交mutation修改了状态state,在vue-devtools中也能跟踪state变化以及提交的mutation。
Vuex的核心概念
StateGettersMutationActionMoudule
State(单一状态树)
Vuex 使用单一状态树—— 用一个对象就包含了全部的应用层级状态。至此它便作为一个“唯一数据源 (SSOT)”而存在。。这也意味着,每个应用将仅仅包含一个 store 实例。单一状态树让我们能够直接地定位任一特定的状态片段,在调试的过程中也能轻易地取得整个当前应用状态的快照。
简单说就是把数据所有有关的数据封装到一个对象中,这个对象就是store实例,无论是数据的状态(state),以及对数据的操作(mutation、action)等都在store实例中,便于管理维护操作。
state直接通过this.$store.state获取state对象。
1 | const store = new Vuex.Store({ |
mapstate辅助函数
当一个组件需要获取多个状态的时候,将这些状态都声明为计算属性会有些重复和冗余。为了解决这个问题,我们可以使用 mapState 辅助函数帮助我们生成计算属性,让你少按几次键:
store/index.js
1 | const store = new Vuex.Store({ |
App.vue
1 | <template> |
Getters
Getters类似计算属性,帮我们做一些重复的事情。
案例
有这样一个store实例,我们需要获取年龄大于20岁的学生数量:
1 | const store = new Vuex.Store({ |
你可能会这样写这样一个计算属性去获取年龄大于20岁的学生数量:
1 | computed: { |
如果很多组件中需要年龄大于20岁的学生数量,你可能会将这个计算属性复制,将filter函数写很多遍,但是如果你有Getters。
在store实例中定义getters
1
2
3
4
5getters: {
getStudentCounts: state => {
return state.students.filter(s => s.age > 20).length
}
}通过属性调用getters
现在只需要调用getters的getStudents对象,就能获取数量。
1
2
3
4
5computed: {
stuCount() {
return this.$store.getters.getStudents
}
}
如果你想查询指定ID(传入ID)的学生信息。
你也可以通过让 getter 返回一个函数,来实现给 getter 传参。在你对 store 里的数组进行查询时非常有用。
定义
getters1
2
3
4
5
6
7
8
9
10
11
12
13
14
15//写法1
getters: {
getStuById: state => id => {
return state.students.find(s => s.id === id)
}
}
//写法2
getters: {
getStuById(state){
return function(age){
return state.students.find(s => s.id === id)
}
}
}通过方法访问
1
2
3
4
5computed: {
stuById() {
return this.$store.getters.getStuById(110)
}
}传入学生ID为110,输出就可以获得结构
Vuex允许在 store 中定义”getter”(可以认为是 store 的计算属性)。就像计算属性一样,getter 是响应式的,只有当数据发送改变才会重新计算。
Getter的参数:state 作为其第一个参数:
1 | const store = new Vuex.Store({ |
通过属性访问
Getter 会暴露为 store.getters 对象,以属性的形式访问这些值:
1 | store.getters.doneData // -> [{ id: 1, text: '...', done: true }] |
Getter可以将 getter 作为第二个参数:
1 | getters: { |
我们可以很容易地在任何组件中使用它:
1 | computed: { |
注意,getter 在通过属性访问时是作为 Vue 的响应式系统的一部分缓存其中的。
通过方法访问
通过 getter 返回一个函数,实现 getter 传参。在你对 store 里的数组进行查询时非常有用。
1 | getters: { |
注意,getter 在通过方法访问时,每次都会去进行调用,而不会缓存结果。
mapGetters 辅助函数
自己理解:不需要每次在计算属性中返回 actions
通过import { mapGetters } from 'vuex'导入
如:我们想获取数组的长度
1 | const store = new Vuex.Store({ |
在组件中使用
1 | <template> |
Mutation(状态更新)
Vuex的store状态更新的唯一方式:
提交MutationMutation主要包括两个部分:
- 字符串的事件类型(type)
- 一个回调函数(handler),这个回调函数就是我们实际进行状态更改的地方,该回调函数的第一个参数就是state
Mutation的定义方式
1
2
3
4
5mutation: {
increment (state) {
state.count++
}
}通过Mutation更新(修改state里的数据)
1
2
3
4
5methods: {
mutation() {
this.$store.commit('increment')
}
}
Mutation 接受单个参数
mutation携带的参数被称为是mutation的载荷(Payload)
案例
在Vuex流程的案例上修改,添加2个按钮分别是让state中的count+5、count+10,增加2个按钮
1 | <button @click="addCount(5)">+5</button> |
新增addCount方法
1 | addCount (count) { |
新增一个mutation
1 | mutation: { |
Mutation 接受多个参数
如果mutation需要接受多个参数,此时可以传一个对象
案例
例如新增一个功能点击按钮新增一个学生,此时需要传学生的ID、姓名、年龄,可以封装成一个学生对象传入。
新增按钮
1
<button @click="addStu()">新增一个指定的学生</button>
新增mutation
1
2
3
4addStu (state, stu) {
state.students.push(stu) // 向数组中添加指定的stu
console.log(state.students.find(s => s.id === stu.id)) // 输出打印查看state中是否有新增stu
}新增(methods)方法
1
2
3
4addStu () {
const stu = { id: 114, name: 'zykj', age: '35'}
this.$store.commit('addStu', stu)
}
Mutation 的提交风格
普通提交风格
1
this.$store.commot('increment', count)
此时count传过去的就是
count=10对象方式提交
1
2
3
4this.$store.commit({
type: 'addCount',
count
})1
2
3
4addCount (state, payload) { // 此时传入的就不是一个count值了,而是一个对象
//获取时也是通过对象
state.count += payload.count
}此时count传过去是一个对象
payload(载荷)1
2
3
4{
type: 'incrementCount',
count: 10
}
Vuex的响应式原理
- Vuex的store的state是响应式的,当state中的数据发生改变时,Vue组件会自动更新。
- 响应式需要遵循规则
- state的对象需要初始化
- 如果需要给state中的对象添加新属性的时候,使用以下方式
- 使用
Vue.set(obj, 'newProp', 123) 用新对象替换旧对象
- 使用
查看示例
在state中增加一个对象user
1
2
3
4user: {
name: 'zhangsan',
sex: '男'
}在app.vue增加按钮修改信息
1
2<h3>{{ $store.state.user }}</h3>
<button @click="updateInfo()">修改信息</button>app.vue增加按updateInfo()方法
1
2
3updateInfo () {
this.$store.commit('updateInfo', 12)
}在mutation中添加updateInfo()
1
2
3updateInfo (state, age) {
state.user.age = age
}点击
修改信息按钮,发现state的值变化了,但是页面没有响应变化(是因为直接修改数据不是相应式的、需要使用其他方法)使用
Vue.set()方法支持响应式1
2
3
4updateInfo (state, age) {
// state.user.age = age
Vue.set(state.user, 'age', 12)
}再次点击
修改信息按钮,发现变响应式了
总结
state未初始化属性(
age)- 使用直接赋值的方式不能响应式
- 需要使用
Vue.set(state.user, 'age', 12)
state已经初始化了,可以使用直接赋值方式
关于删除属性
1
2
3// 该方法没有响应式,需要使用Vue.delete
// delete state.user.age
Vue.delete(state.user, age)// 响应式删除age
Mutation 的类型常量
一个vue文件中有关mutation的方法太多了,常常可能写错,所有可以在store文件夹下定义一个mutation-type.js的常量。
定义一个
mutation-type.js的常量、并将其导出1
2
3
4updateInfo (state, age) {
// state.user.age = age
Vue.set(state.user, 'age', 12)
}修改
App.vue的updateinfo方法1
2
3
4
5
6//导入变量
import { UPDATEINFO } from './store/mutation-type'
[UPDATEINFO] () {
this.$store.commit(UPDATEINFO, 12)
}修改store的
index.js,将mutation的方法名也改成常量使用方式1
2
3
4
5
6
7
8
9import { UPDATEINFO } from './mutation-type'
[UPDATEINFO] (state, age) {
// state.user.age = age
Vue.set(state.user, 'age', 12)
// 该方法没有响应式,需要使用Vue.delete
// delete state.user.age
// Vue.delete(state.user, age)// 响应式删除age
}这样保证了所有的方法都定义在
mutation-type.js中,不会出问题。
Mutation 必须是同步函数
一条重要的原则就是要记住 mutation 必须是同步函数。为什么?请参考下面的例子:
查看示例
使用mutation操作更新state的时候,使用异步修改数据。
修改updateInfo()方法
1 | [UPDATEINFO] (state, age) { |
发现页面的数据改变了,但是vue-devtools工具中并未跟踪到改变。所以我们不要在mutation中进行异步操作。这里就引出了我们之后要学习的 Action
现在想象,我们正在 debug 一个 app 并且观察 devtool 中的 mutation 日志。每一条 mutation 被记录,devtools 都需要捕捉到前一状态和后一状态的快照。然而,在上面的例子中 mutation 中的异步函数中的回调让这不可能完成:因为当 mutation 触发的时候,回调函数还没有被调用,devtools 不知道什么时候回调函数实际上被调用——实质上任何在回调函数中进行的状态的改变都是不可追踪的。简单来说就是在mutation上使用异步函数会导致devtools不能追踪
Action
Action 类似于 mutation,不同在于:
- Action 提交的是 mutation,而不是直接变更状态。
- Action 可以包含任意
异步操作。
查看示例
新增一个mutation
1
2
3updateName (state, name) {
state.user.name = name
}新增一个actions:第一个参数默认为 context (上下文),第二个参数为 传入的参数
1
2
3
4
5
6
7
8actions: {
// context:上下文
aUpdateInfo (context, name) {
setTimeout(() => {
context.commit('updateName', 'zykj')
}, 1000)
}
}在
App.vue中新增一个按钮修改user对象姓名1
2<h3>异步修改的信息:{{ $store.state.user }}</h3>
<button @click="aUpdateInfo()">异步修改信息</button>给按钮新增方法
1
2
3
4aUpdateInfo () {
// 第一个参数为actions中的函数、第二个为参数
this.$store.dispatch('aUpdateInfo', 'lisi')
}点击
异步修改信息按钮测试在点击按钮之后,信息修改了,dev-tools也能跟踪到state的变化。通过
$store.dispacth()方法来调用actions,发送异步请求,在actions中需要提交mutation来修改state。actions回调,在异步操作后,成功或者失败都应该会有回调,$store.dispacth()返回一个Promise对象,修改actions,返回一个Promise对象,成功调用resolve(msg),将成功的msg传入1
2
3
4
5
6
7
8
9
10
11
12actions: {
// context:上下文
aUpdateInfo (context, name) {
let msg = '响应成功'
return new Promise((resolve, reject) => {
setTimeout(() => {
context.commit('updateName', 'zykj')
resolve(msg)
}, 1000)
})
}
}修改
aUpdateInfo()方法,获取回调参数msg,此时的response就是actions中回调的msg,也可以支持失败的回调,只要actions中使用了reject,在aUpdateInfo()方法中catch回调结果就能获取resjct对象回传结果。1
2
3
4
5aUpdateInfo () {
this.$store.dispatch('aUpdateInfo', 'lisi').then(response => {
console.log(response)
})
}再次点击
异步修改信息,打印结果信息Actions 支持同样的载荷方式(payload)和对象方式进行分发
1
2
3
4
5
6
7
8
9
10// 以载荷形式分发
store.dispatch('aUpdateInfo', {
name: 'lisi'
})
// 以对象形式分发
store.dispatch({
type: 'aUpdateInfo',
name: 'lisi'
})
分发 Action
Action 通过 store.dispatch 方法触发:
1 | store.dispatch('mutation中的函数名') |
组合 Action
Action 通常是异步的,那么如何知道 action 什么时候结束呢?更重要的是,我们如何才能组合多个 action,以处理更加复杂的异步流程?
首先,你需要明白 store.dispatch 可以处理被触发的 action 的处理函数返回的 Promise,并且 store.dispatch 仍旧返回 Promise:
1 | actions: { |
现在你可以:
1 | store.dispatch('actionA').then(() => { |
在另外一个 action 中也可以:
1 | actions: { |
一个 store.dispatch 在不同模块中可以触发多个 action 函数。在这种情况下,只有当所有触发函数完成后,返回的 Promise 才会执行。
moudules(模块)
由于使用单一状态树,应用的所有状态会集中到一个比较大的对象。当应用变得非常复杂时,store 对象就有可能变得相当臃肿。
为了解决以上问题,Vuex 允许我们将 store 分割成模块(module)。每个模块拥有自己的 state、mutation、action、getter、甚至是嵌套子模块——从上至下进行同样方式的分割。
比如这样
1 | const moduleA = { |
模块的局部状态
模块内部的
mutation 和 getter,接收的第一个参数是模块的局部状态对象(state)。模块内部的 action,局部状态是
context.state,根节点状态则为context.rootState。对于模块内部的 getter,第三个参数是
根节点状态(rootState)。1
2
3
4
5
6
7
8
9
10
11
12
13
14
15
16
17
18
19
20
21
22
23
24const moduleA = {
state: () => ({
count: 0
}),
mutations: {
increment (state) {
// 这里的 state 对象是模块的局部状态
state.count++
}
},
actions: {
incrementIfOddOnRootSum (context) {
if ((context.state.count + context.rootState.count) % 2 === 1) {
context.commit('increment')
}
}
},
getters: {
doubleCount (state, getters, rootState) {
console.log(rootState.count) // 获取的是根状态的count
return state.count * 2
}
}
}注意actions的context
1
2
3
4
5
6
7actions: {
incrementIfOddOnRootSum ({ state, commit, rootState }) {
if ((context.state.count + context.rootState.count) % 2 === 1) {
context.commit('increment')
}
}
}{ state, commit, rootState }对应context对象中的属性,使用ES6的对象解构。
命名空间
默认情况下,模块内部的 action、mutation 和 getter 是注册在全局命名空间的, 这样使得多个模块能够对同一 mutation 或 action 作出响应。
我们已经知道了,模块内部的 action、mutation 和 getter 默认是注册在全局命名空间的。如果我们只想让他们在当前的模块中生效,应该怎么办呢?
通过添加 namespaced: true 的方式使其成为带命名空间的模块。当模块被注册后,它的所有 getter、action 及 mutation 都会自动根据模块注册的路径调整命名。例如:
1 | const store = new Vuex.Store({ |
启用了命名空间的 getter 和 action 会收到局部化的 getter,dispatch 和 commit。换言之,你在使用模块内容(module assets)时不需要在同一模块内额外添加空间名前缀。更改 namespaced 属性后不需要修改模块内的代码。
在带命名空间的模块内访问全局内容(Global Assets)
如果你希望使用全局 state 和 getter,rootState 和 rootGetters 会作为第三和第四参数传入 getter,也会通过 context 对象的属性传入 action。
若需要在全局命名空间内分发 action 或提交 mutation,将 { root: true } 作为第三参数传给 dispatch 或 commit 即可。
1 | modules: { |
在带命名空间的模块注册全局 action
若需要在带命名空间的模块注册全局 action,你可添加 root: true,并将这个 action 的定义放在函数 handler 中。例如:
1 | { |
项目结构
Vuex 并不限制你的代码结构。但是,它规定了一些需要遵守的规则:
- 应用层级的状态应该集中到单个 store 对象中。
- 提交
mutation是更改状态的唯一方法,并且这个过程是同步的。 - 异步逻辑都应该封装到
action里面。
只要你遵守以上规则,如何组织代码随你便。如果你的 store 文件太大,只需将 action、mutation 和 getter 分割到单独的文件。
对于大型应用,我们会希望把 Vuex 相关代码分割到模块中。下面是项目结构示例:
1 | ├── index.html |
- 支付宝
- 微信